seong
Flutter 간단한 프로필 앱 , 아이콘을 버튼화, 모서리 둥글게 본문
사진, 아이콘의 모서리를 강제로 둥글게 만들기 - ClipRRect
원하는 위젯을 ClipRRect로 감싸주고 borderRadius속성 주면 된다.
Widget _buildHeaderPic() {
    return Padding(
      padding: const EdgeInsets.all(16.0),
      child: ClipRRect(
        borderRadius: BorderRadius.circular(5),
        child: AspectRatio(
          aspectRatio: 5 / 3,
          child: Image.asset(
            selectePic[selectedId],
            fit: BoxFit.cover,
          ),
        ),
      ),
    );
  }
아이콘을 버튼화 시키는 방법
Inkwell로 감싸고, onTap로 행위를 주면 된다.
사용될 컴포넌트들 모두 생성 및 정리

main.dart(실행파일)
import 'package:flutter/material.dart';
import 'package:flutter_profile/pages/profile_page.dart';
import 'package:flutter_profile/theme.dart';

void main() {
  runApp(const MyApp());
}

class MyApp extends StatelessWidget {
  const MyApp({Key? key}) : super(key: key);

  @override
  Widget build(BuildContext context) {
    return MaterialApp(
      theme: theme(),
      home: ProfilePage(),
    );
  }
}
theme.dart 앱의 기본적인 테마들을 작성하는 파일
MaterialColor을 따로 작성해준 이유는 primary컬러로 white,black등 작성이 되지 않는다.
그럴때는 MaterialColor로 작성해주면 된다.
import 'package:flutter/material.dart';

const MaterialColor primaryWhite = MaterialColor(0xFFFFFFFF, {
  50: Color(0xFFFFFFFF),
  100: Color(0xFFFFFFFF),
  200: Color(0xFFFFFFFF),
  300: Color(0xFFFFFFFF),
  400: Color(0xFFFFFFFF),
  500: Color(0xFFFFFFFF),
  600: Color(0xFFFFFFFF),
  700: Color(0xFFFFFFFF),
  800: Color(0xFFFFFFFF),
  900: Color(0xFFFFFFFF),
}); // 앱 실행시 한번만 읽으면 되는 부분을 const로 작성

ThemeData theme() {
  return ThemeData(
    primarySwatch: primaryWhite, // 기본 배경 색상
    appBarTheme: AppBarTheme(
      iconTheme: IconThemeData(color: Colors.blue),
    ),
  );
}
profile_page
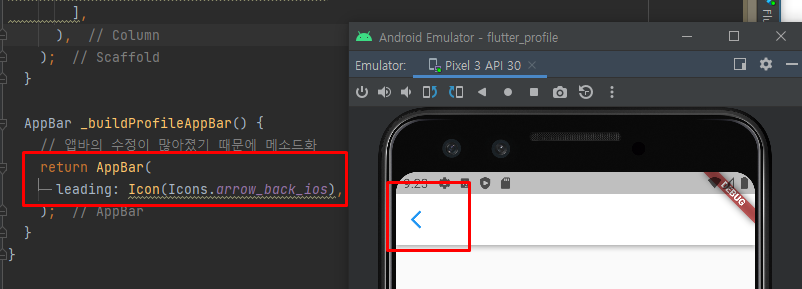
여러 페이지가 있을때 페이지 이동 하면 뒤로 가기버튼 자동 생성해주는 속성 leading : Icon(Icons.arrow_back_ios)
import 'package:flutter/material.dart';
import 'package:flutter_profile/components/profile_buttons.dart';
import 'package:flutter_profile/components/profile_count_info.dart';
import 'package:flutter_profile/components/profile_drawer.dart';
import 'package:flutter_profile/components/profile_header.dart';
import 'package:flutter_profile/components/profile_tab.dart';

class ProfilePage extends StatelessWidget {
  const ProfilePage({Key? key}) : super(key: key);

  @override
  Widget build(BuildContext context) {
    return Scaffold(
      appBar: _buildProfileAppBar(),
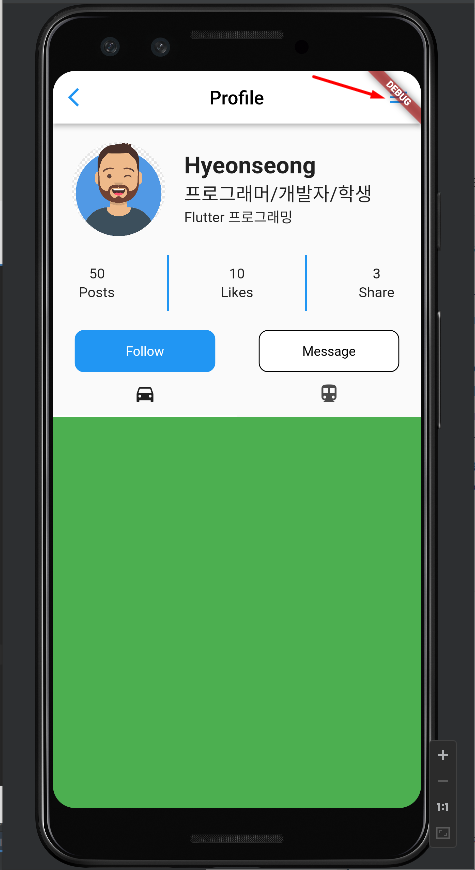
      endDrawer: ProfileDrawer(),
      body: Column(
        children: [
          SizedBox(height: 20),
          ProfileHeader(),
          SizedBox(height: 20),
          ProfileCountInfo(),
          SizedBox(height: 20),
          ProfileButtons(),
          // 남아 있는 세로 공간 모두 차지 하기 위해 Expanded
          Expanded(child: ProfileTab()),
        ],
      ),
    );
  }

  AppBar _buildProfileAppBar() {
    // 앱바의 수정이 많아졌기 때문에 메소드화
    return AppBar(
      leading: Icon(Icons.arrow_back_ios),
      title: Text(
        "Profile",
        style: TextStyle(color: Colors.black),
      ),
      centerTitle: true,
    );
  }
}
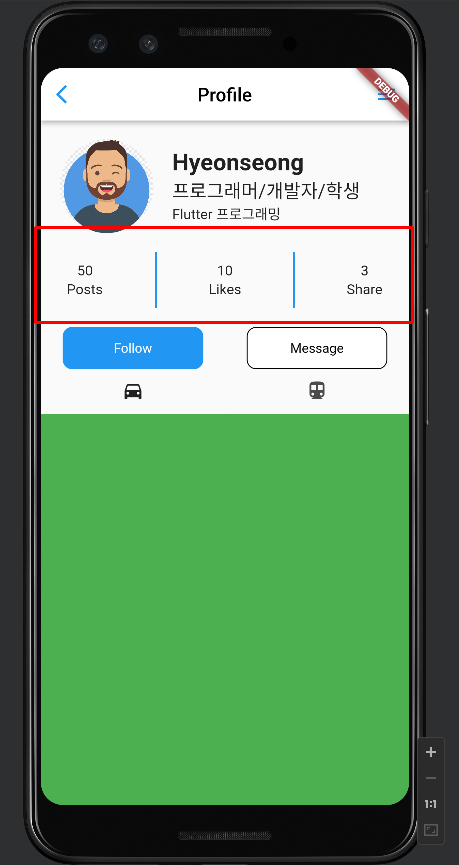
profile_count_info.dart 파일(Likes,Post,Share를 다룸 )
Row 나 Column을 mainAxis를 사용할때 주의할 점은 각각 기준이 다르기 때문에 주의 해야한다.
import 'package:flutter/material.dart';

class ProfileCountInfo extends StatelessWidget {
  const ProfileCountInfo({Key? key}) : super(key: key);

  @override
  Widget build(BuildContext context) {
    return Row(
      mainAxisAlignment: MainAxisAlignment.spaceAround,
      children: [
        _buildInfo("50", "Posts"),
        _buildLine(),
        _buildInfo("10", "Likes"),
        _buildLine(),
        _buildInfo("3", "Share"),
      ],
    );
  }

  Widget _buildInfo(String count, String title) {
    return Column(
      children: [
        Text(
          count,
          style: TextStyle(
            fontSize: 15,
          ),
        ),
        SizedBox(
          height: 2,
        ),
        Text(
          title,
          style: TextStyle(
            fontSize: 15,
          ),
        ),
      ],
    );
  }

  Widget _buildLine() {
    return Container(
      width: 2,
      height: 60,
      color: Colors.blue,
    );
  }
}
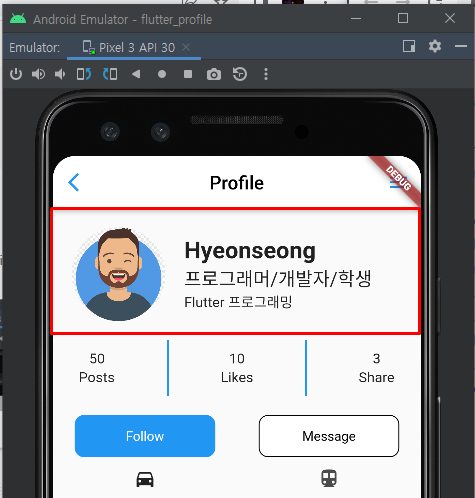
profile_header.dart부분
CircleAvatar는 아이콘을 동그랗게 만들어주는 속성이다.(이것 외에 ClipRRECT 속성이 있다)
import 'package:flutter/material.dart';

class ProfileHeader extends StatelessWidget {
  const ProfileHeader({Key? key}) : super(key: key);

  @override
  Widget build(BuildContext context) {
    return Row(
      children: [
        SizedBox(width: 20),
        _buildHeaderAvatar(),
        SizedBox(width: 20),
        Column(
          crossAxisAlignment: CrossAxisAlignment.start,
          children: [
            Text(
              "Hyeonseong",
              style: TextStyle(
                fontSize: 25,
                fontWeight: FontWeight.w700,
              ),
            ),
            Text(
              "프로그래머/개발자/학생",
              style: TextStyle(fontSize: 20),
            ),
            Text(
              "Flutter 프로그래밍",
              style: TextStyle(fontSize: 15),
            ),
          ],
        ),
      ],
    );
  }

  Widget _buildHeaderAvatar() {
    return SizedBox(
      width: 100,
      height: 100,
      child: CircleAvatar(
        backgroundImage: AssetImage("assets/avatar.png"),
      ),
    );
  }
}
profile_drawer 파일 (앱의 목록 탭)
import 'package:flutter/material.dart';

class ProfileDrawer extends StatelessWidget {
  const ProfileDrawer({Key? key}) : super(key: key);

  @override
  Widget build(BuildContext context) {
    return Container(
      width: 200,
      height: double.infinity,
      color: Colors.blue,
    );
  }
}

profile_buttons(Fllow, Message의 버튼 담당)
버튼을 여러 페이지에 사용할 수도 있으므로 버튼은 메소드로 만들어서 사용
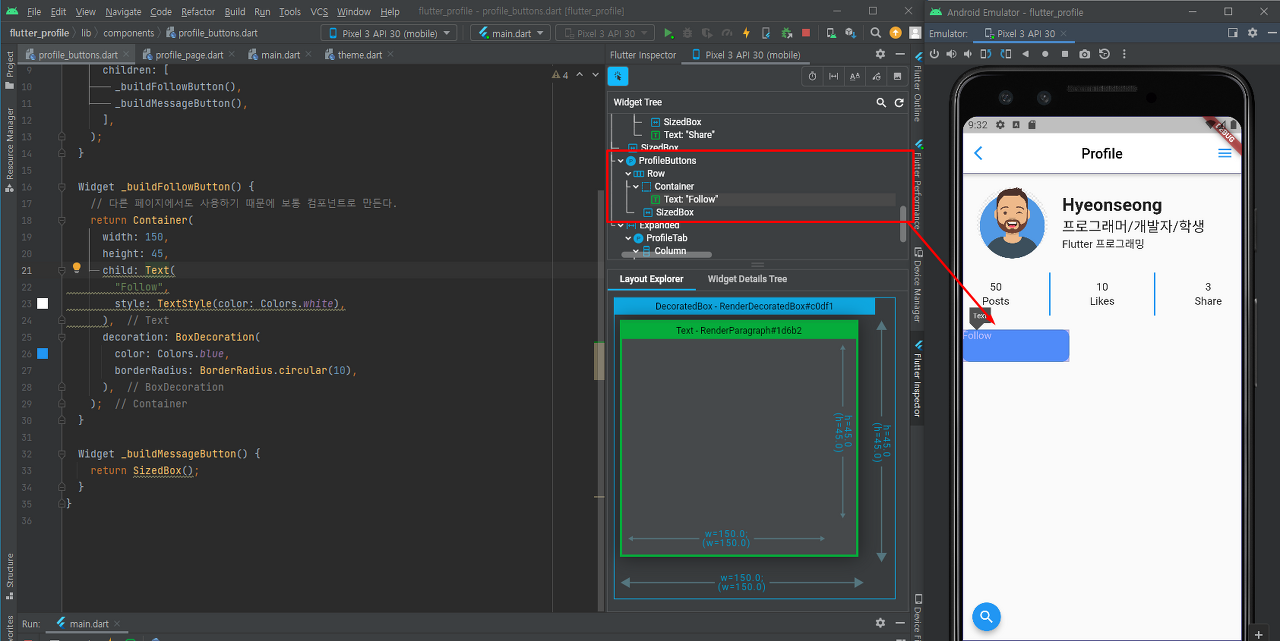
버튼의 Text 배치
배치를 할 때 우측 하단 flutter -Inspector로 어디에 값을 줘야할지 확인 해 주는게 좋다.
현재 Text는 Container를 전부 차지 하는게 확인 된다. Container에 바로 위치를 선언 해주면 된다
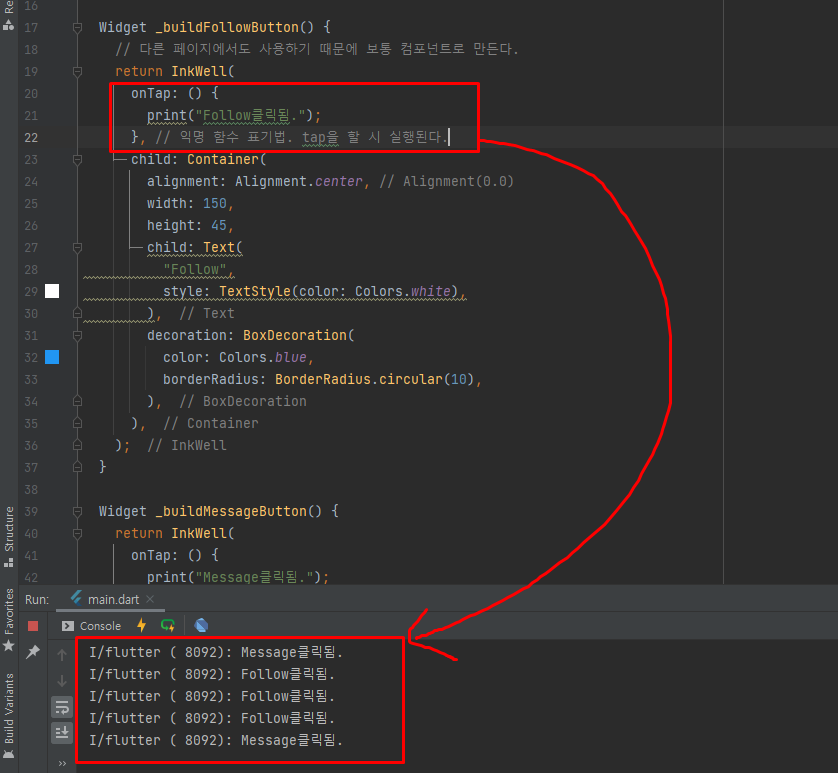
onTap실행시 콘솔 화면 , 아이콘을 버튼화 시키는 방법 : Inkwell
아이콘을 Inkwell로 감싸고 onTap을 주면 버튼이 된다.
import 'package:flutter/material.dart';

class ProfileButtons extends StatelessWidget {
  const ProfileButtons({Key? key}) : super(key: key);

  @override
  Widget build(BuildContext context) {
    return Row(
      mainAxisAlignment: MainAxisAlignment.spaceAround,
      children: [
        _buildFollowButton(),
        _buildMessageButton(),
      ],
    );
  }

  Widget _buildFollowButton() {
    // 다른 페이지에서도 사용하기 때문에 보통 컴포넌트로 만든다.
    return InkWell(
      onTap: () {
        print("Follow클릭됨.");
      }, // 익명 함수 표기법. tap을 할 시 실행된다.
      child: Container(
        alignment: Alignment.center, // Alignment(0.0)
        width: 150,
        height: 45,
        child: Text(
          "Follow",
          style: TextStyle(color: Colors.white),
        ),
        decoration: BoxDecoration(
          color: Colors.blue,
          borderRadius: BorderRadius.circular(10),
        ),
      ),
    );
  }

  Widget _buildMessageButton() {
    return InkWell(
      onTap: () {
        print("Message클릭됨.");
      }, // 익명 함수 표기법. tap을 할 시 실행된다.
      child: Container(
        alignment: Alignment.center, // Alignment(0.0)
        width: 150,
        height: 45,
        child: Text(
          "Message",
          style: TextStyle(color: Colors.black),
        ),
        decoration: BoxDecoration(
            color: Colors.white,
            borderRadius: BorderRadius.circular(10),
            border: Border.all()),
      ),
    );
  }
}
profile_tab
Tab_Bar 만드는 순서
- StateFul 위젯으로 만들기
- TabContoller가 필요함.(TabBar 와 TabBarView를 연결 해주기 위함)
- Mixin을 해줘야함 (has 라고 이해하면 편함. ~를 가진다. (다형성을 생각할 필요가 없다.)
- SingleTickerProviderStateMixin
- TabBarView는 높이가 필요함
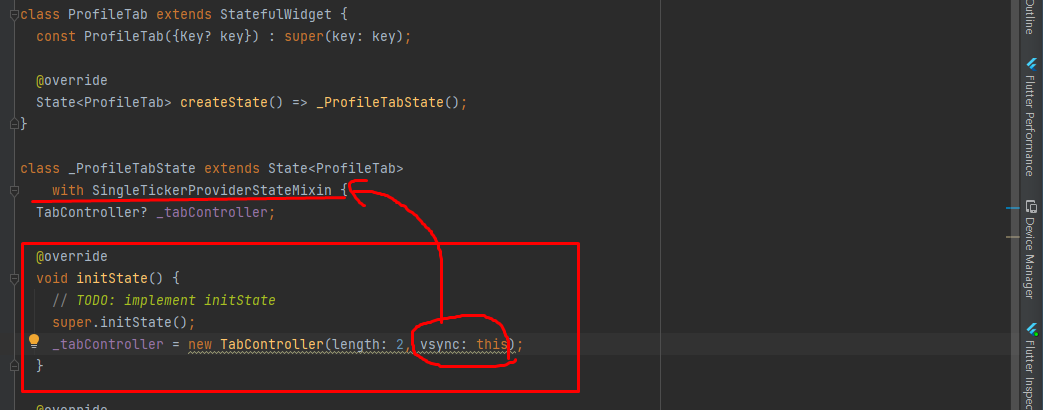
initstate의 역할 : 최초의 클래스가 실행될 때 한번만 실행된다.
initstate만들어 주고, _tabController를 객체 생성 length는 현재 탭의 갯수를 뜻한다 2개,
vsync는 어떤 클래스를 실행 할지 결정한다. 자신 클래스를 실행 하므로 this, 하지만 this만 써주면 오류가 난다. → Type가 TickerProvider이기 때문이다.


import 'package:flutter/material.dart';

class ProfileTab extends StatefulWidget {
  const ProfileTab({Key? key}) : super(key: key);

  @override
  State<ProfileTab> createState() => _ProfileTabState();
}

class _ProfileTabState extends State<ProfileTab>
    with SingleTickerProviderStateMixin {
  TabController? _tabController;

  @override
  void initState() {
    // 최초의 클래스가 실행 될 때 한번만 실행한다.
    // TODO: implement initState
    super.initState();
    // length는 아이콘의 갯수
    _tabController = new TabController(length: 2, vsync: this);
  }

  @override
  Widget build(BuildContext context) {
    return Column(
      children: [
        _buildTabBar(),
        Expanded(child: _buildTabBarView()),
      ],
    );
  }

  Widget _buildTabBar() {
    return TabBar(
      controller: _tabController,
      tabs: [
        Tab(icon: Icon(Icons.directions_car)),
        Tab(icon: Icon(Icons.directions_transit)),
      ],
    );
  }

  Widget _buildTabBarView() {
    return TabBarView(controller: _tabController, children: [
      Container(
        color: Colors.green,
      ),
      Container(
        color: Colors.red,
      ),
    ]);
  }
}
'Flutter > Flutter' 카테고리의 다른 글
| 샘플 이미지 무료 사용 주소 Picsum (0) | 2022.08.16 |
|---|---|
| Flutter 프로필 앱 (2) - Gride View (0) | 2022.08.16 |
| 06 Flutter - Store_app 01(프로젝트 생성) (0) | 2022.08.04 |
| 05 안드로이드 스튜디오(Android studio)설치 및 flutter 플러그인 (0) | 2022.08.03 |
| 04 Flutter 설치하기 (0) | 2022.08.03 |


